A few weeks ago, I had the idea of attempting to configure Service Manager 2012 R2 Management servers (Console connections) into HA.
Looking online, there wasn’t a lot available in terms of information or guides from other people on how to do it. So, off I went into my Development environment to see what I could achieve.
To my delight, I was able to achieve HA for console connections/management servers utilising Citrix NetScaler’s load balancing.
Having already built the Service Manager environment and having Citrix NetScaler’s readily available, I could jump straight in and play (so to speak 🙂 )
First thing to do is login to your NetScaler and add both SCSM MGT servers to the “Services” list.
After a quick check on Microsoft’s Service Manager Port Assignment article, I was quick to find that Service Manager Consoles connect via port 5724. So I added both servers as services monitoring port 5724.
After a short period of time, both services come UP and are ready to be added to our Load Balancing Virtual Server. Which we’re about to create.
Over to “Virtual Servers” in the NetScaler.

Click Add and configure a friendly name. Add in your Load Balancing Virtual Server (LBVS) IP and the port to monitor.
Under Services and Service Groups, add in your two Services (Service Manager Servers) as Bindings.
Under Method, choose how you want to configure your failover. For me, we want the analysts to connect to the console “closest” to them, based of IP hash.
So they get the best response. As the two management servers are based in different physical locations. However, you can use load balanced, round robin, lowest ping etc.
After a short period of time, the LBVS will come UP and be ready to service. Ready to connect to our LBVS right? Sure, via the console you can connect to the IP of our LBVS.
However, I wanted to make it easy for our analysts to connect and remember, no one likes remembering IP Addresses.
A quick stop over in DNS, create an A record and we’re good to go!
Create your host name to connect consoles to, add in your IP address of your LBVS and you’re SET.
Time to test it out in the console. Open up SCSM Console, click Tools, Connect. Type in our DNS name and click connect.
After the console does a quick restart, we’re connected via our LBVS. We should probably check that right? Back over to our NetScaler.
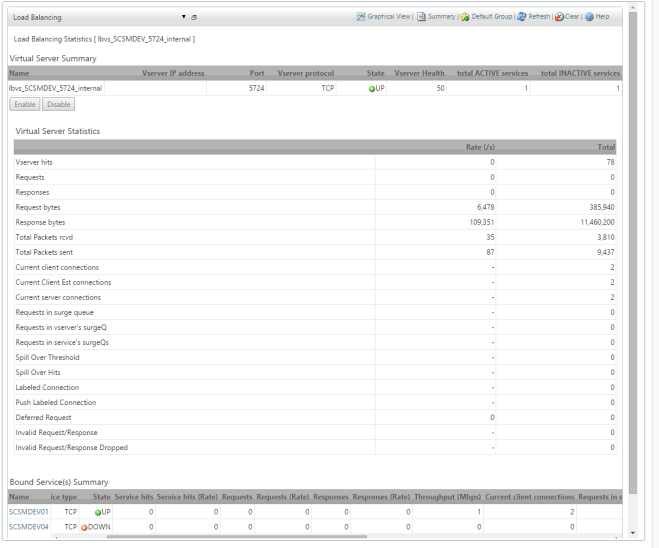
Click on Traffic Management, Load Balancing, Virtual Servers, click on our Service Manager LBVS and click Statistics.
We can see both of our services (servers) are UP and ready to accept connections. Using the tiny scroll bar on the bottom, scroll across till you see the header “Current Client Connections”.
Alright! We’re connected to one of our servers through our LBVS name! Now, let’s test that we can connect to the other server at the same time.
Login to a server in the other location, open the console and connect to our LBVS name. Check the LBVS again.
AWESOME!
We can connect to both servers at the same time, using the LBVS name. Now lets test some failures 🙂
On one of the servers, stop the System Center Data Access Service and System Center Management Configuration services.
Check in the LBVS in the netscaler, after a short period (30 seconds) we can see the server go Down.
Our console connection should error out now, right? Nope. The NetScaler will automatically move the active connection over to our fail-over partner server.
Once we restart the services, the server will come back UP. However, our active session will still be on the fail-over partner, until we restart the console.
I hope this helps you configure your console connections into HA, I know this has helped us a fair amount with our console connections 🙂
Thanks,
Shayne Ray.


[…] and genius!@ShayneRarma has detailed the exact settings to use over on his blog here: https://scucnewcastle.wordpress.com/2015/10/21/configure-service-manager-2012-r2-management-servers-…Marcel Zehner also has documented a similar solution using Microsoft Network load Balancers here: […]
LikeLiked by 1 person